|
|
|||
|
|||
720P HD Mini DV Camera aka 808 HD (1280x720) |
||||||
Stryker
Basics 2K Fun Stryker Build |
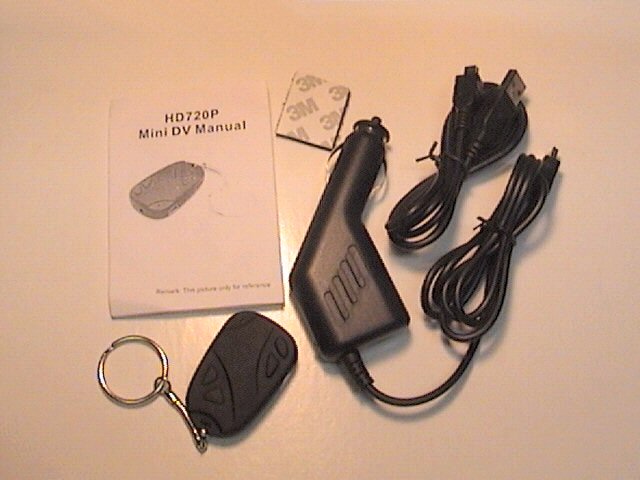
720P HD Mini DV - 808 HD are sold on EBAY for around $40 USD. If you live in the U.S. it will probably take about 6-8 business days to get it which is pretty fast from Hong Kong.
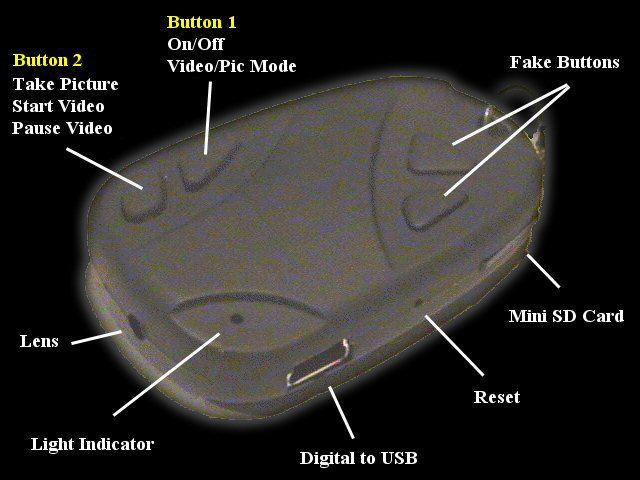
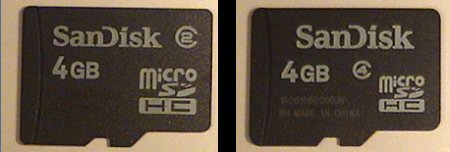
How it works: If you look at the buttons on top you will see 4, the back 2 are fake. Button 1: Click power button to turn cam on (indicator lights solid yellow) Hold 3 seconds to shut down (indicator light goes off) Hold 3 seconds to stop a video during recording and shut down cam (indicator light goes off) Note: The power button also acts as the mode selector to switch between video and pictures. With camera turned on click power once and its in Picture mode (yellow light blinks once), click power button again its in Video mode (yellow light blinks once) Button 2: Click button to take a picture (indicator light blinks once for each picture) Click button to record a video (indicator light blinks 3 times then goes off) See note above. Side note: Sometimes you dont know if your recording video or the cam is shut off when the indicator light is off, I guess thats why they call it a spy cam cuz a recording light would make it visible :) After 65 seconds of non use the camera will automatically shut down. Camera drive: Using the USB connector push the power button on cam, a box will pop up "installing drivers" which are the USB mass storage device and video camera USB device. A new drive will be listed on your pc, depending on your pc it may appear as "Removable Disk (J;) " What I do to make things easier is right click on the drive letter of cam and rename the drive to something like "Key Cam " so each time you plug cam into pc it shows "Key Cam ' for the drive instead of "Removable Disk (J;) " Note: Using USB to access the camera drive you will need to push the power button once to view folder options, its kinda slow to pop up so give it couple seconds. Flash drive: Internal or external memory can be used as a flash drive. Internal (memory-built in) means it is not removable. External (memory-SD card) means it is removable. Memory is nothing more than storage space that can be used to store any type of file you have on your pc. If you want to use the camera connect the USB then drag and drop or cut and paste files into the 100MEDIA folder of camera. Pictures and videos: All media files will be saved to the "DCIM/100MEDIA folder on the camera drive. Right click any of the media files you created in the folder for options like Cut, Copy, Paste, Delete. What I do is highlight all media, cut and paste them to a folder on my pc, this deletes them off camera and saves them to pc. Video file sizes: 20 minutes of constant recording time will put you around 1 GB. This cam will do a 40 minute video on full charge. You really dont need more than a 4G SD card if your only using battery power. Using windows movie maker: Movie Maker wont edit .MOV files but if you download a converter you can convert the .MOV to.AVI. I used a free converter called "SUPER" to converter them to .AVI so they can be edited with movie maker. Note: Depending on settings you choose in "SUPER" it can create a huge file size or smaller file size, adjust settings to your liking. Bring the .AVI into movie maker and cut out the parts of video you dont need, this is most important part of making smaller file sizes. When publishing the video using movie maker select the "more setting button" in the list then select the "Windows Media HD 720P (5.9Mbps)" button for 1280x720 video size. Buying SD cards: SD cards range from 2-32 GB. The cards used are the Micro SD/TF/SDHC with storage space 4GB/8GB/16GB/32GB. Tip: TF = TransFlash, SDHC = Secure Digital High Capacity. Your local computer store may sell these cards but you will probably find them cheaper on ebay. Example: Sandisk 8GB Micro SD/TF/SDHC class 4 on ebay costs about $17 USD. The higher the class number (2, 4, 6,) the faster the read/write speed, also little more expensive. Note the class numbers in pic below. When inserting the SD card the brass pins on card will face upwards towards buttons of camera. Remove or insert SD card: push card IN until you hear a "click" sound.
Charging: USB takes about 45 minutes to fully charge if the battery is completely empty. When charging the red light will remain solid, when fully charged the red light will shut off. When the cam reaches low voltage a solid yellow light will appear (recharge battery) How to set the time and date: To set the time and date you need to make a text file called TimeSet.txt so open notepad and type this in as shown: 2010-01-01 00:00:00 Save the notepad file as TimeSet.txt There are 3 ways to add this file to the camera. #1 Using a sd card reader or sd adapter place the TimeSet.txt file onto the sd card next to the DCIM folder , then plug sd card back into camera and the next time you power up camera it should be set. #2 Using USB place the TimeSet.txt file next to the camera folder named DCIM (this is the root of camera) #3 Using USB place the TimeSet.txt file onto the drive letter of your camera by going to start/computer/camera drive /then drag and drop or copy and paste the file onto the drive letter. Unplug the camera and power it off. Next time you turn it on the file will be accepted and the time and date will change. If you cant figure it out heres the TimeSet.txt I made, just change the numbers to your date and time. Once the TimeSet.txt has been accepted the camera will delete it, so you wont see it in folder next to DCIM folder anymore. If the battery goes dead it will lose the date and time so hang on to the TimeSet.txt file. Removing the Time
and Date Updated: The date
and time can be removed or added very easy by adding a .bin file to cameras
SD card. These files came directly from vendor to change the cameras
firmware. People have used these files with great success but there is
rumored to be a very early version of HD cam that will crash using these
files. I cannot confirm this earlier version as there are no markings on
these cameras to say which you may have. 720P as Web Cam: With cam off press and hold both buttons down simultaneously, when the yellow light blinks twice plug in USB cable then release buttons. A pop up window on pc will show progress of driver installation. When drivers finish loading, repeat process to access web cam mode. If you dont have the Amcap program you can download it here. Open "Amcap.exe" to view the live capture from camera. Tip: Exit the Amcap program first before shutting down camera or program may not close (not responding error) Original manual that comes with camera. Chin-english is getting better, you can read this one :) Inside the 720P HD: Take a closer look at the internal parts of the 720P HD Pros and Cons: Pros: Sharp clear audio/video. Pictures have no timestamp. Empty battery takes about 45 minutes to fully charge. Cons: The videos get brighter in the center than outer areas, I call this the flash light effect. Sometimes you get a strange orange tint in videos. The videos are in .MOV format, great for shooting videos but not so good for editing them. The .MOV videos will need to be converted to .AVI if you want to edit them using movie maker. 808 #3 -VS- 808 HD: Being the 808 #3 has the best quality lets compare both side by side in a split screen, this should give a good idea how each handles motion, color, darkness, and sound. The 720P video was shrunk to match the 808 #3 size of 720x480 so the 720P is actually slightly better than shown in Video but you can still see the difference.
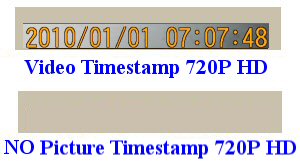
This is
what the time stamp looks like on my 720P HD cam. All videos start with PTDCxxxx and
the time/date have a clear background located at the bottom
right of each video. No timestamp on pictures.
|
|||||
Contact
© 2005-2014 2KOOL4U.com