D001
 
D005
 
#3
 
#8
 
#11
HD
#16
HD
#18
HD
#20
HD
HQ30
HD
#26
HD
C1234
HD
Camera
Programs


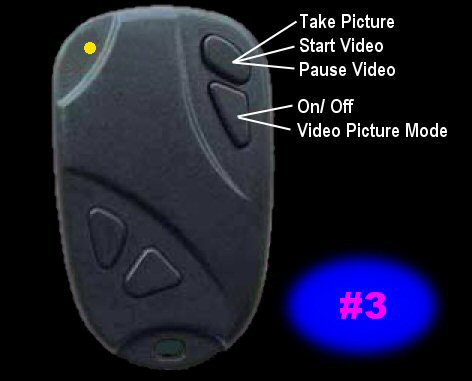
DVK 808 #3 Keychain Mini Camera (720x480)


Ebay Stores

 
allyounger315
 
Specifications
 
Camera Specs
 
Basic Operation
 

Power Button:

Hold button for 3 seconds to turn cam On or Off.
Mode changer, switches between video or pictures

Shutter Button:

Starts or Stops video recording
Take a snapshot.

 
Camera Drive
 
When connecting the cam using the USB connector for the first time a box will pop up "installing drivers" which are the USB mass storage device and video camera USB device. A new drive will be listed on your pc, as example: Removable Disk (J;)
 
Pictures and Videos
 
All media will be saved to the "DCIM/100MEDIA folder on the camera drive. Right click any of the media files you created in the folder for options like Cut, Copy, Paste, Delete. What I do is select all files then Cut and paste them to a folder on my pc, this deletes them off SD card and saves them to pc.

You should get about 0:50:00 minutes of constant recording around 4 GB.
Pictures are about 350KB each at 1280x1024

File names for all recorded media start with SUNPxxxx

 
Charging
 
During charging the yellow led will slow flash, when fully charged the yellow led will stop flashing. USB takes about 2 hours to charge if the battery is completely empty. If the yellow led does not blink and you know the battery is low try replacing the USB cable, in many cases this solves the problem.
 
Movie Maker 6 for Win 7
 
Windows live movie maker that shipped with windows 7 is more of a down graded movie maker 6. For those who want the better movie maker 6 for win7 -64 bit edition you can download it here, download also includes K-lite codec pack 64 bit. See how to: video

PIP Using Movie Maker 6
Make a picture in picture video using RehanFX transitions and effects for Vista movie maker.
See example video:
RehanFx PIP

 
SD Cards
 

SD cards range from 2-32 GB. The cards used are the Micro SD/TF/SDHC with storage space 4GB/8GB/16GB/32GB. Tip: TF = TransFlash, SDHC = Secure Digital High Capacity. Your local computer store may sell these cards but you will probably find them cheaper online. The higher the class number (2, 4, 6...) the faster the read/write speed. Transcend, Kinston, and SanDisk are popular brands. 4GB class 4 or higher recommended. Class numbers will be circled, see pic below.

Class is the rate in which data flows to and from the card.
Example:
Class 2 = 2MB/second
Class 8 = 8MB/second
Class 10 = 10MB/second
This is the minimum data transfer for each card.

When inserting the SD card the brass pins on card will face towards back of camera.

To remove or insert SD card push card IN until you hear a "click" sound.

 
Setting Time and Date
 

Windows software to set time and date automatically using USB

2K_Ez_Configuration

To set time and date manually you need to make a text file called Tag.txt
Open notepad and type this in as shown:

[date] Space/Enter
2010/01/01 Add your date then Space/Enter
12:06:20
Add your time

Save the notepad file as Tag.txt

There are a few ways to add this file to the camera.

Using a SD card reader or SD adapter place the Tag.txt file onto the SD card next to the DCIM folder, then plug SD card back into camera and the next time you power up camera it should be set.

Using USB place the Tag.txt file next to the camera folder named DCIM (this is the root of camera)

Using USB place the Tag.txt file onto the drive letter of your camera by going to start/computer/camera drive /then drag and drop or copy and paste the file onto the drive letter.

Unplug the camera and power it off. Next time you turn it on the file will be accepted and the time and date will change. If you cant figure it out heres the TAG.txt  I made, just change the numbers to your date and time. Once the Tag.txt has been accepted the camera will delete it.

Removing the Time and Date:

As of now there are only a few ways to remove time and date, use Logoaway, Virtual Dub, Crop video, Add a title or layer over the time and date or stretch the video. To be honest none of these methods are that good, you may just want to leave it and save yourself the headaches of trying removing it.

 
WebCam Mode
 
If you dont have the webcam drivers you can download the drivers here. Once the drivers are installed plug the camera into the USB and press the power button to enter webcam mode, a window will pop up saying "Installing Driver Software" once it has completed you can view the live capture with Programs/SPCA1528/amcap.exe"
 
Original Manual
 
Original manual that comes with camera.
 
Camera CD
 
None
 
Inside the 808 #3
 
Take a closer look at the internal parts of the 808 #3
 
Pros / Cons
 

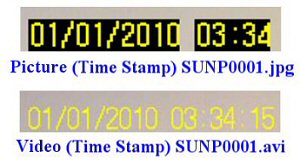
Pros: Has great sound/video quality.

Cons: Cant remove time stamp. No led to show when its recording.

This is what the time stamp looks like on the 808 #3 cam.
Time/date located at the bottom right of each video/picture.


Contact
© 2005-2016 2KOOL4U.com