Nav
Stryker
Basics
2K Custom Parts
Stryker
Models
Flight Simulator
Center
of Gravity
Adjusting / Elevons
Painting / Sanding
Paint Designs
Glue Types
Repairs
Motor Mount
Adding CF Rods
Tape
Hinges
Ubec
ABC
Fuses
Prop Basics
AmpsWattsVolts
WaveosScope
Online Calculators
Video
2K
Fun Stryker Build
2k Fun Stryker
|
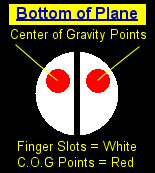
The Stryker has a (center of
gravity) located on the bottom of plane where you put your fingers to throw it. Note
inside the finger slots 2 smaller holes, these are the C.O.G points. To test center of
gravity after electronics are installed place the battery in plane but dont connect leads, you just need to have total
weight of plane before setting the C.O.G. Next, put your thumb and index finger into
the C.O.G. points and try and balance plane. If the plane tips forward or backward move
the battery and/or receiver slightly forward or backwards in compartments for
any additional C.O.G adjustments. The battery has the greatest effect when setting C.O.G.
being its heaviest. What I like to do is place a mark on the plane somewhere
showing where the battery sits, this way each time you put in the battery
you know its in the right spot plus it serves as a reference point for
adjusting the battery if COG is off a little bit. PIC of
C.O.G. holes.
Once we start
getting into bigger heavier components C.O.G becomes more difficult. Finding
the right spot to put things is limited. Although the common belief that you
can move the C.O.G. forward is somewhat true but not exactly. The more you
move the C.O.G. forward the more your elevons will need to be raised to keep
a nose heavy plane flying level. In return you will be creating drag. You can fly with C.O.G. a little bit forward but its
not recommended.
|