|
|
|||
|
|||
Stryker Mounts |
||||||
Stryker
Basics 2K Fun Stryker Build |
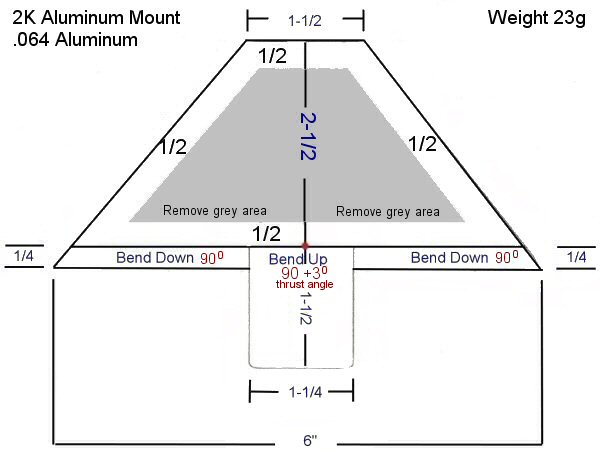
Older A-B Mounts: I couldnt get a 28mm brushless motor to fit thru rear ring. Maybe I could have heated it up enough to stretch it but chose to cut off back ring and use a zip tie to hold it down. The front ring was tight but did fit the motor. PIC of motor mount. I used a small drill bit and made an elongated hole just big enough for the zip tie to fit thru. Worked ok but this mount is pretty much useless for other motors. C Mounts: Much stronger than the older A-B mounts and fits a 28mm mega motor perfect with no mods needed. For those wondering if the stock 480 brushed motor will fit the Stryker C motor mount, yes both are same diameter. The C mounts do have its own problems too, the 4 small tabs on the plastic mount ring holding the motor on tend to break off very ez. So far I had 2 mounts break this way. PIC Try not to over tighten screws and use some thread lock as they can vibrate loose. After the last one broke I decided to use piece of tape around end of motor so it fits into plastic mount ring snug, which helped alot. Another good idea is go to home depot or lowes and pick up some thin 28mm nylon washers and glue it inside ring of mount, you may also need to drill the 4 screw/air holes in the washer to match motor and possibly longer motor screws depending on how thick the nylon washer is. Make Your Own Mounts: Paying $50 dollars for mount is simply ridiculous, I went to tower hobby and picked up sheets of 6"x12"x.064 aluminum for $7 bucks a sheet. Each sheet I can make 3 mounts. I took some measurements and designed a new mount on paper. Some of the advantages of this mount was this: it acts as a heat sink, able to run cooling fins completely around motor, universal to fit all motors, outrunners and inrunners can be used, attaches with epoxy and ez to make. The mount diagram below is for my 28mm mega 16-25-3 motor but you can make a 36mm mount and elongate the 4 screw holes to fit both 28 and 36mm. Just make the bend up tab slightly bigger for a 36mm motor. To set thrust angle bend the tab straight up 90 degrees + 3 more degrees for thrust angle.
The only tools needed are a drill, jigsaw, file, hammer, vise and ruler. If you have these basic tools you can make mounts like this or create your own design. To make the motor holes to fit your motor exactly do this: Take a piece of paper and make a tiny hole so you can push it down over the shaft of motor, with the paper sitting flat down on mount holes take a pencil or crayon and rub over the paper leaving a tracing of the mount holes on the paper. Then all you do is center up the tracing to your aluminum mount and mark the holes to be drilled. Pretty ez eh...
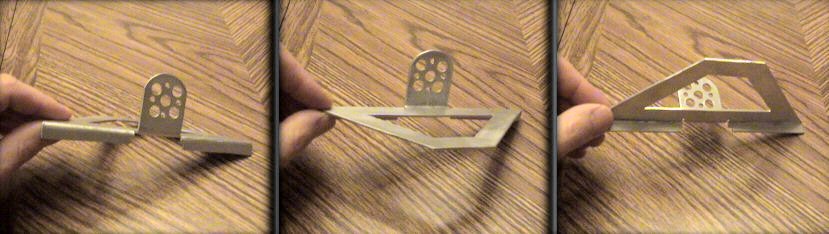
This is the finished product. To attach it click here |
|||||
Funny and Amazing pictures, Cool
cars, Flash files, Video clips, Interesting facts,
Spectacular powerpoint files, Funny audio files, Strange and cool animals,
Big women, Illusions and Art work.
Contact
© 2005-2012 2KOOL4U.com